Markers Tab
A complete guide to placing markers and generating a rigged, skinned character.
Overview
What markers are
Markers are small, visible empties you place on your character. Each one tells Easy Rigify where a joint belongs — such as a shoulder, a knuckle, or an eye corner. Once the markers are in place, the addon snaps a Rigify metarig to them, so you never have to line up bones in Edit Mode by hand.
Markers are standard Blender empties. You can select them, grab them (G), and nudge any that land in the wrong spot. Adjusting a marker is always just click-and-drag — there is nothing hidden to "commit".
Where it lives
Everything lives in the 3D Viewport sidebar. Press N in the viewport and open the "Easy Rigify" tab. The tab has four sub-tabs:
- Markers — place markers on the body, hands, and face (this page)
- Rig — add a metarig, align it to markers, generate
- Skin — bind the mesh and clean up weights
- Tools — fan bones and viewport helpers
The big picture
- Pick your body mesh
- Detect the body, then the fingers, then the face
- Fix any markers that are off, then mirror one good side across
- Run "Check All Markers"
- Go to the Rig tab: align and generate
- Go to the Skin tab: bind and clean up
Detection is a starting point, not the finish line — expect to nudge a few markers by hand on stylised or unusual characters. That's normal and fast.
Editions
- Full edition — adds one-click AI detection (EasyDetect Body / Fingers / Face) alongside the geometric detectors
- Lite edition — geometric detection only. The EasyDetect buttons and the finger-engine switch don't appear; everything else is identical
A scene saved in one edition opens fine in the other.
Body Markers
- Body Mesh — set this to your character mesh first. It's remembered and reused by every detector, so you only pick it once.
- Symmetrical Detect — when on, detection mirrors the left and right sides so they match exactly. Leave it on for symmetric characters.
- EasyDetect Body (Full Edition) — neural body-marker placement. Best on unusual proportions and stylised bodies.
- Auto Detect Body — geometric body-marker placement from the mesh shape. Places pelvis, spine, neck, head, shoulders, arms, elbows, hands, thighs, shins, feet, toes, and heels. Marker sizes auto-scale to the character.
Either button places the full body-and-leg set. The scene is left as-is; nothing is hidden.
Finger Markers
Engine (Full Edition): EasyDetect or Geometric
- EasyDetect — the full AI pipeline; best result per hand.
- Geometric — mesh-only detection, with its own tuning sliders:
- Auto-snap Wrist — moves the HAND marker onto the mesh wrist before detecting (the geometric walk starts there)
- Knuckle Depth / Thumb Depth / Min Finger Size — tune placement for thick, thin, or stylised hands
In Lite there's no engine choice — the geometric engine (with the same sliders) is always used.
- EasyDetect Fingers (or "Detect Fingers (Geometric)") — places every hand and finger joint in one click. Requires the HAND and ELBOW markers from body detection.
- Place All Fingers — a manual, two-clicks-per-finger workflow: first click is the fingertip, second is the knuckle. The two middle joints are interpolated between them, and the right hand mirrors from the left.
- The small down-arrow beside "Place All Fingers" opens a per-finger picker, so you can redo just one finger (thumb, index, middle, ring, pinky) instead of all of them.
- Straighten Finger Markers — projects each finger's joints onto its bend plane, removing side-to-side wander while keeping the natural curl.
- Re-solve Selected Finger — re-runs detection for just the finger whose markers you have selected.
Place All Fingers — walkthrough
Clicking "Place All Fingers" starts an interactive two-click modal session for each finger. Click the tip first, then the knuckle, for the thumb; move to the index finger and do the same; repeat for all five fingers. You can undo each click and redo it.
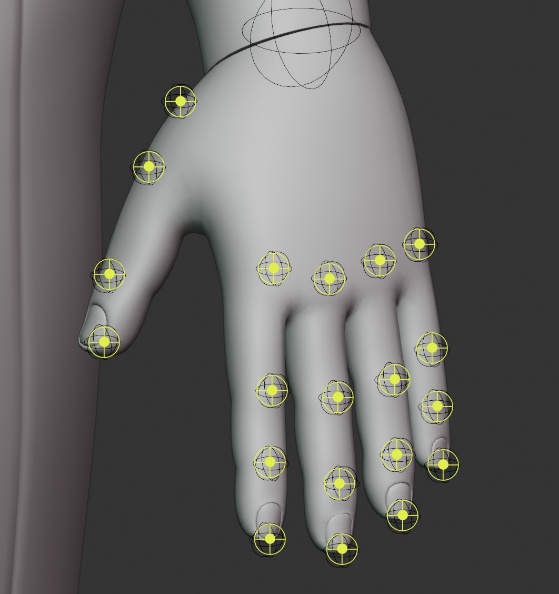
After all five clicks, this mirrors the finger markers from left to right. You can then manually adjust each marker to fit the character's fingers for better bone placement.
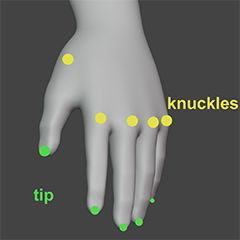
Finger Picker popover
Opens a panel where you can select individual fingers to place separately. Useful if one finger was misplaced and you want to re-run just that one. Check or select which finger(s) to place, then click "Place Selected Fingers".
Facial Markers
Show Facial Markers
Expands or collapses the facial marker section. When off, facial markers and their detection steps are hidden. Turn this on only when your character has a face rig. Leave it off for body-only rigs (the Human (No Face) metarig).
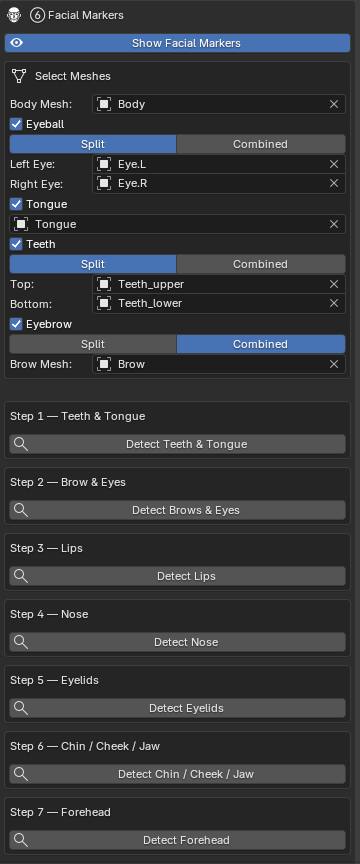
Select Meshes
You must assign mesh objects before running any detection step. The system uses these meshes to project marker positions onto the correct geometry.
- Body Mesh — the main face/head mesh, usually the same object as the body mesh set in Body Markers. Used for lips, nose, chin, cheeks, forehead, jaw, and temple markers.
- Eyeball — enable if your character has separate eyeball objects. Eye Count: Single (one shared mesh, rare) or Split (separate Left/Right Eye objects, most common). Used for eyelid detection and eye-center marker placement.
- Tongue — enable if your character has a separate tongue mesh. Used for tongue marker placement inside the mouth.
- Teeth — enable if your character has separate teeth meshes. Teeth Count: Single (one mesh for both) or Split (separate Top/Bottom objects). Used for upper/lower teeth marker placement.
- Eyebrow — enable if your character has separate eyebrow mesh objects. Brow Count: Single or Split, same idea as eyes/teeth.
EasyDetect Face (Full Edition) — one-click neural face-landmark placement. Needs the eye mesh selected to work effectively.
Detection steps
Run each step in order after assigning all meshes above. Each step projects markers onto the mesh using geometry analysis.
Step 1 — Teeth & Tongue
Detects the position and orientation of upper and lower teeth (FACE_TEETH_T, FACE_TEETH_B) and tongue segments (FACE_TONGUE, FACE_TONGUE_001, FACE_TONGUE_002). Markers need manual adjustment to fit the teeth and tongue — cube-shaped empties for teeth, plain axes for the tongue. Requires Teeth and/or Tongue enabled above with meshes assigned.
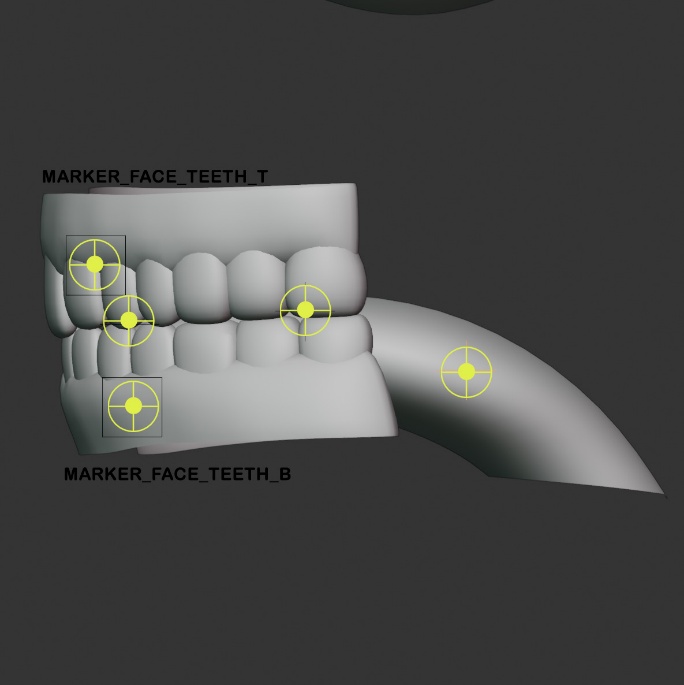
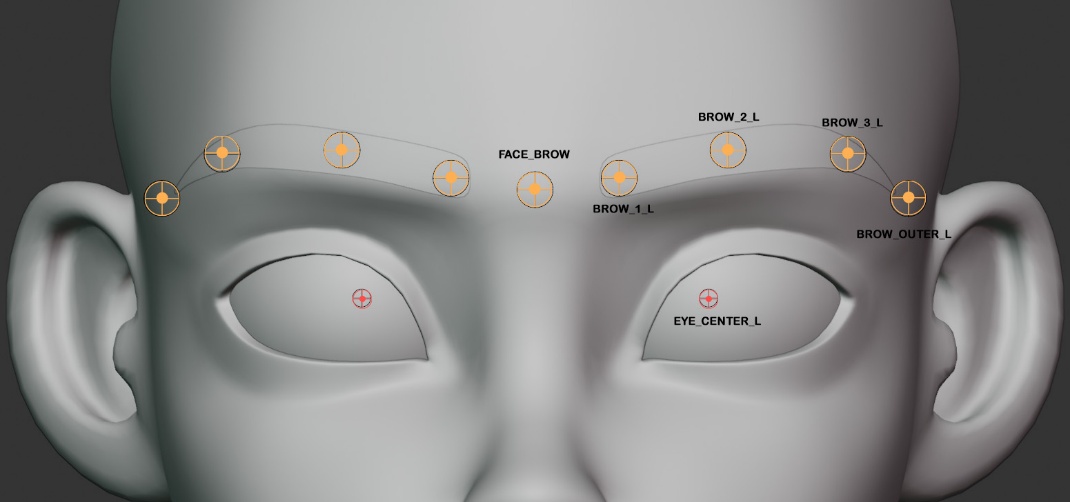
Step 2 — Brow & Eyes
Places 4 markers on each eyebrow and a marker for each eyeball center. Requires Brow Mesh assigned, and eyeball mesh(es) assigned if available.
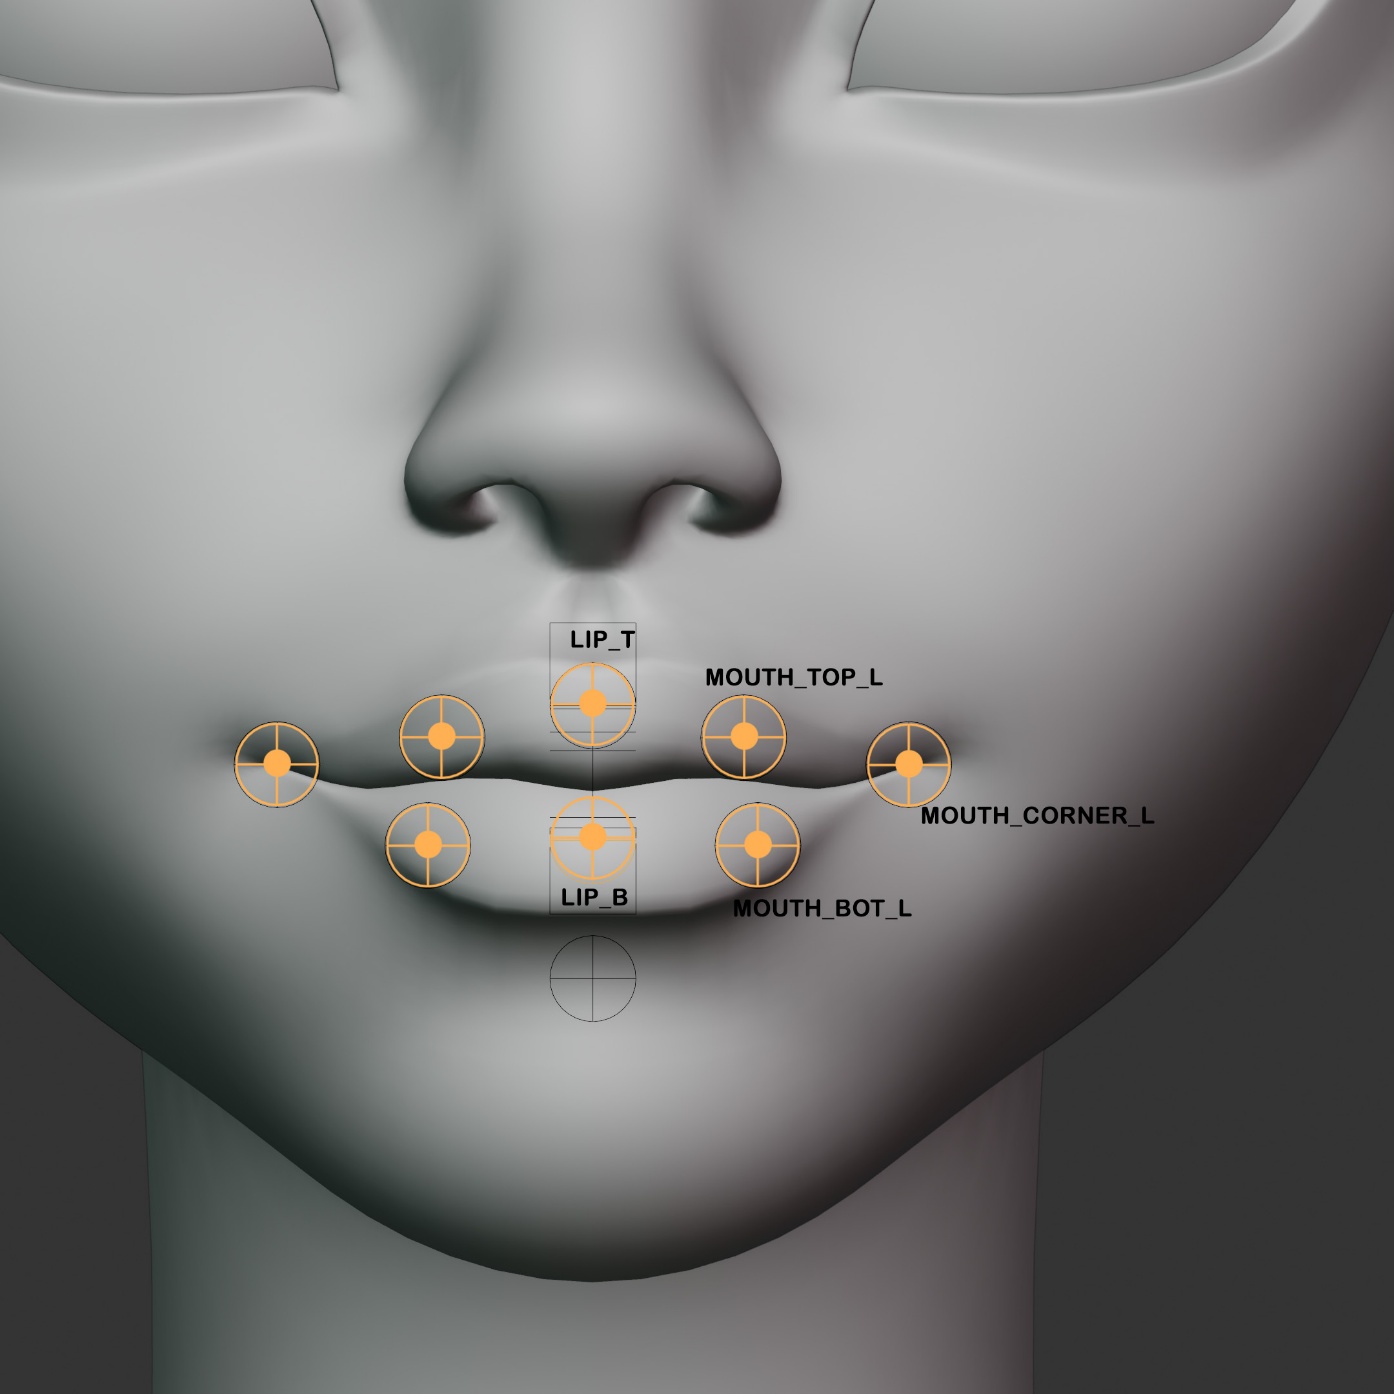
Step 3 — Lips
Detects the lip contour: upper lip (FACE_LIP_T, FACE_MOUTH_TOP_L/R), lower lip (FACE_LIP_B, FACE_MOUTH_BOT_L/R), and mouth corners (FACE_MOUTH_CORNER_L/R). Requires Body Mesh assigned; also needs the teeth marker placed for better detection. Lip markers usually need a little adjustment to sit correctly on the character's lips.
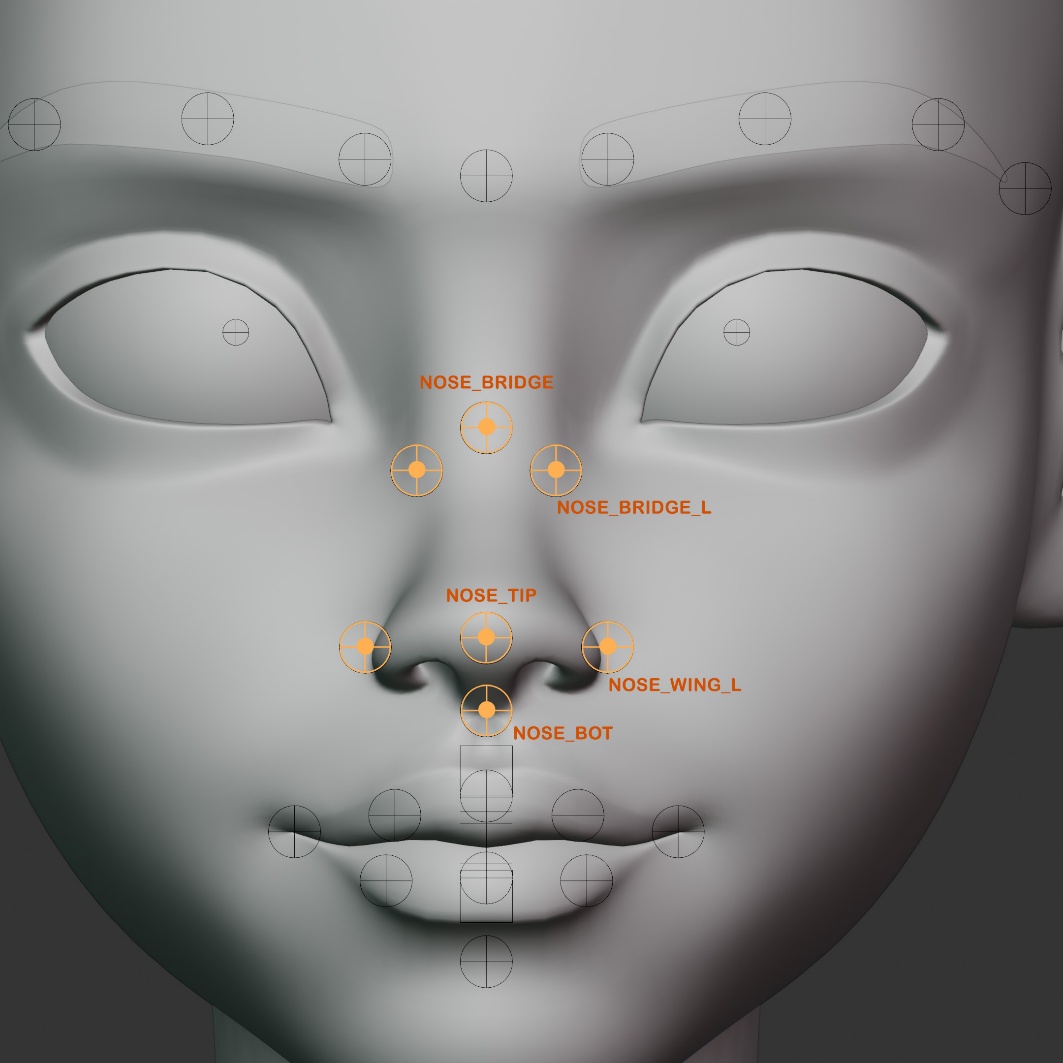
Step 4 — Nose
Detects nose bridge (L&R), nose tip, nose wing (L&R), and nose bottom. Requires Body Mesh assigned.
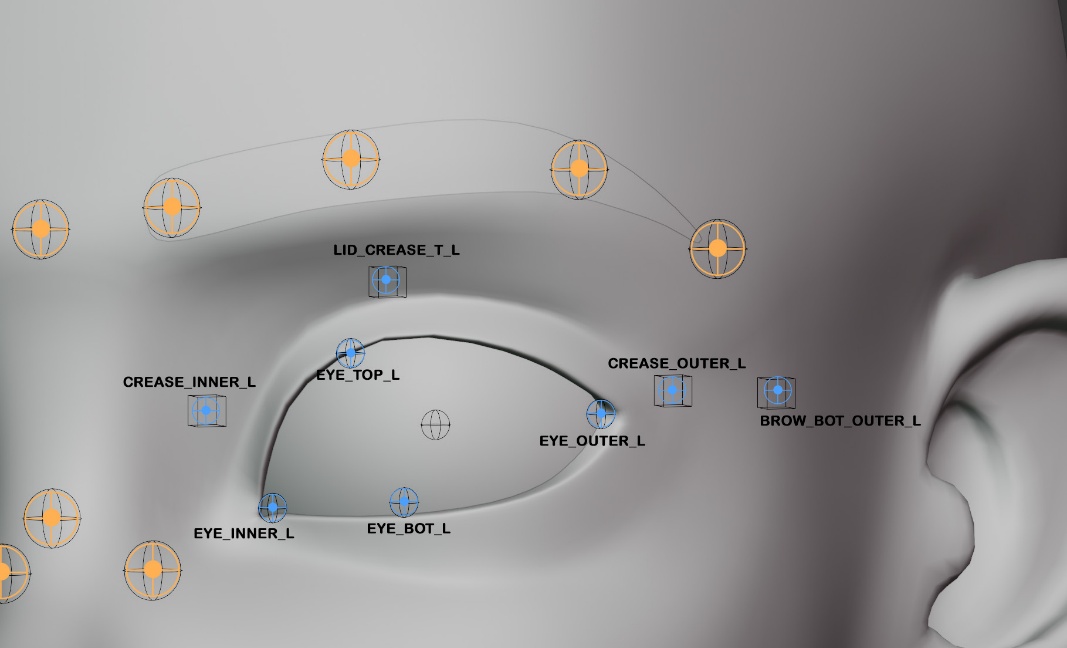
Step 5 — Eyelids
Detects upper/lower eyelid, eyelid crease points, inner/outer lid corners, and Brow_bot_outer (extends outside the eyelid toward the ear). Requires Body Mesh assigned; eyeball mesh(es) highly recommended for accurate eyelid projection.
Step 6 — Chin / Cheek / Jaw
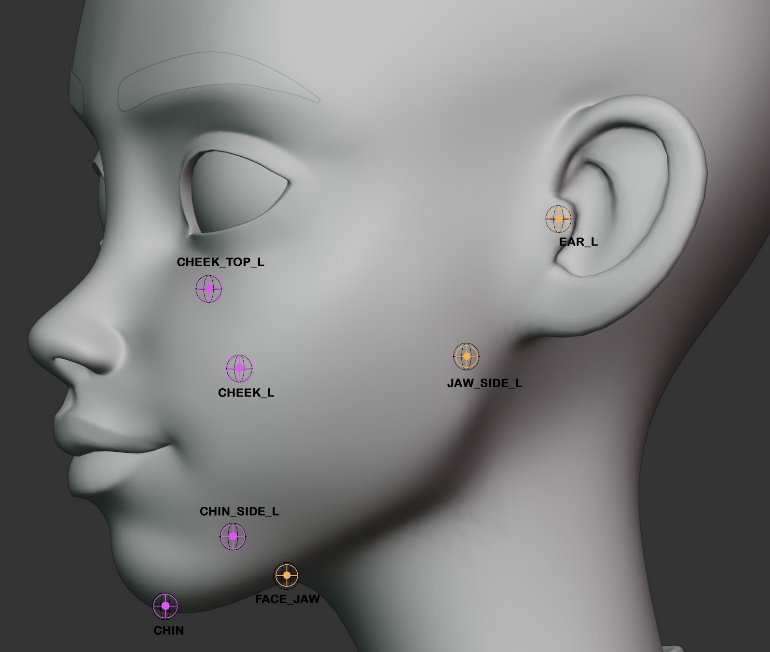
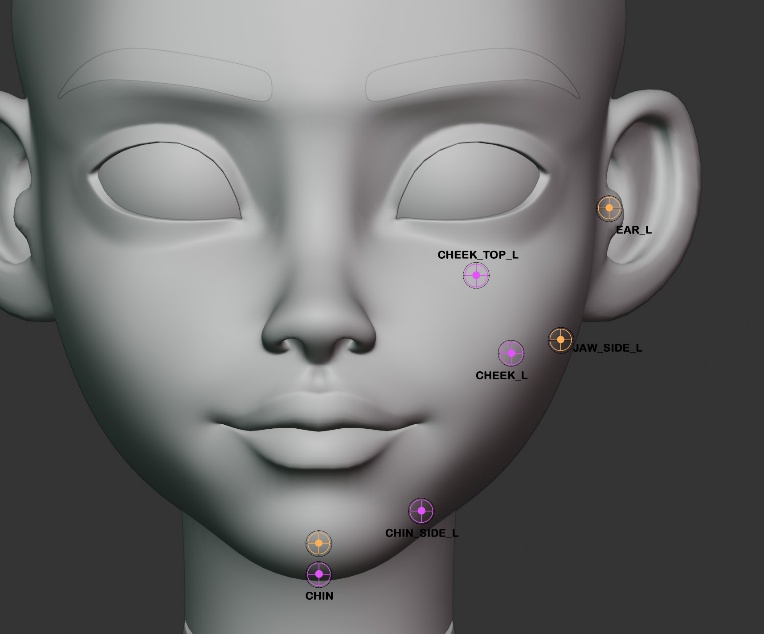
Detects chin center and sides (FACE_CHIN, FACE_CHIN_L/R), jaw line control points (FACE_JAW, FACE_JAW_SIDE_L/R), cheek high points (FACE_CHEEK_T/B_L/R), and ear attachment point (FACE_EAR_L/R). Requires Body Mesh assigned.
Step 7 — Forehead
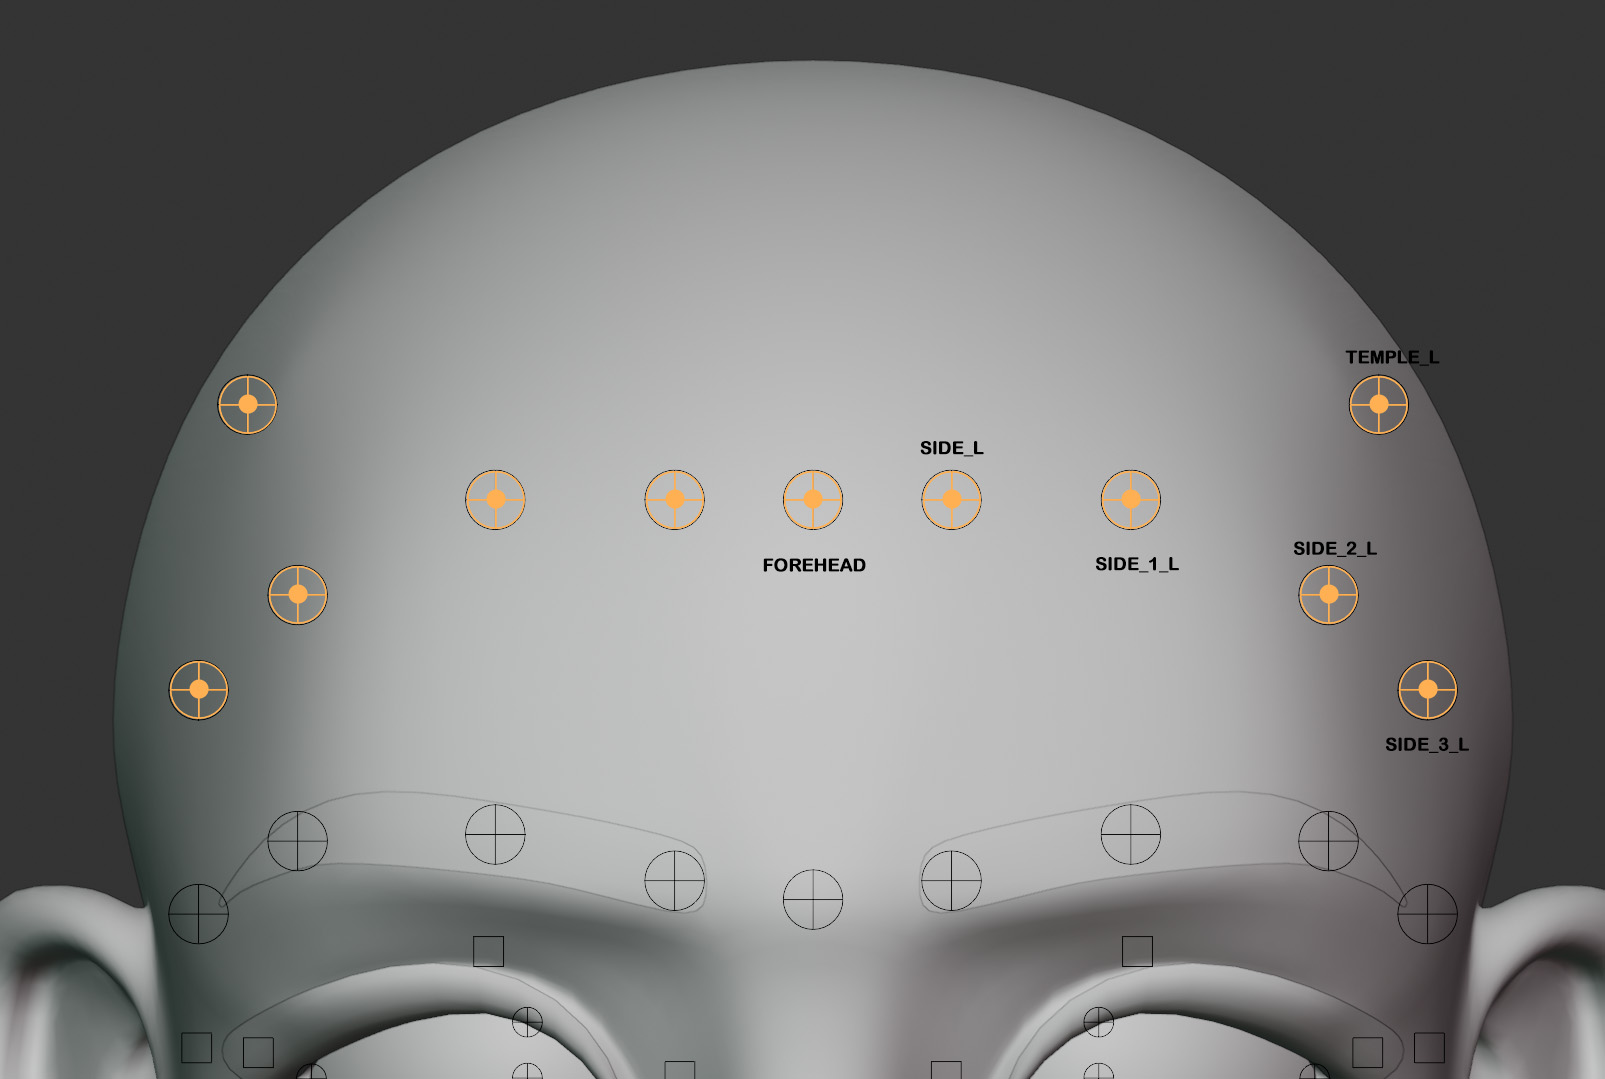
Detects forehead center (FACE_FOREHEAD), forehead side arc (FACE_FOREHEAD_SIDE_L/R), and temple (FACE_TEMPLE_L/R). Requires Body Mesh assigned.
After detection
Inspect the face markers in the viewport. The system projects markers onto the nearest mesh surface geometry — for stylized characters, some markers may need manual fine-tuning.
To adjust a face marker: click it to select, move it with G. Face markers accept any position — alignment reads them the same way as manually placed markers.
Delete All Markers
Removes all body AND face markers from the scene and deletes both the RigifyMarkers and RigifyFaceMarkers collections. Use this to start fresh if you need to redo the entire placement.
Mirror
Live Symmetry — while on, moving a marker on one side moves its counterpart on the other in real time.
- Mirror L→R — copies all _L markers to their _R counterparts by mirroring the X position (negates X, preserves Y and Z). Use after manually repositioning left-side markers to keep both sides symmetrical.
- Mirror R→L — same, in reverse — copies right-side markers to the left side.
Marker Count
Shows X/Y body markers placed (e.g. "18/24 body markers placed"). When all markers are placed the icon changes from info to a checkmark. This count covers only body markers — face markers aren't included.
Viewport Controls
- Show Markers / Hide Markers — hides or shows the entire RigifyMarkers collection. Useful to declutter the viewport while checking marker positions against the mesh. The button label updates to reflect the current state.
- X-Ray — toggles X-Ray mode on the active viewport. With X-Ray on, markers are visible through the mesh, making it easier to place markers at joint centers inside the body. Turn on when placing hip, pelvis, and spine markers, which are typically inside the mesh geometry.
- Mesh Selection — toggles whether the character mesh is selectable in the viewport. Turn off when you want to click-to-place markers without accidentally selecting the mesh; turn back on for normal work.
- Marker Hints — when on (default), selecting any marker shows a colored hint overlay in the top-right corner of the 3D viewport with the marker's anatomical name, a short description of where it should be placed, and a color-coded category (blue = body, green = arm, orange = finger, pink = face). Turn off if the overlay is distracting.
Full Workflow — Step by Step
1. Prepare the mesh
Before anything else, apply scale and rotation on your character: Object → Apply → All Transforms. Unapplied scale is the single most common cause of bad alignment and binding. Do this once, up front.
2. Pick the body mesh
Markers tab → Body Markers → Body Mesh. Set it to your character. This is reused by every detector.
3. Detect the body
Click "Auto Detect Body" (or "EasyDetect Body" in the full edition). The spine, arms, legs, and feet markers appear. Orbit around and check them; grab (G) and nudge any that are off.
4. Detect the fingers
Click "EasyDetect Fingers" (or "Detect Fingers (Geometric)"). If the hands need work, use "Place All Fingers" for a manual pass, the per-finger picker to redo one finger, or "Straighten Finger Markers" to tidy wander.
5. Detect the face (optional)
Expand "Show Facial Markers", pick your eye/teeth/brow/tongue meshes, then run "EasyDetect Face" or the Step 1–7 detectors in order. Correct each region as you go.
6. Mirror and correct
Refine one side, then use "Mirror L→R" (or R→L) to copy it across. Turn on Live Symmetry if you want both sides to move together while you adjust.
7. Check
Run "Check All Markers". Fix anything it reports before moving on — aligning consumes the markers, so they need to be correct now.
8. Align and generate (Rig tab)
Switch to the Rig tab. Add a Rigify metarig, click "Align Rig to Markers" to snap every bone onto your markers (bone rolls included), then "Generate Rig" to produce the final Rigify control rig.
9. Bind and clean up (Skin tab)
Switch to the Skin tab. Bind the mesh with Smart Bind, then use the weight tools — surgical joint tightening, smoothing, symmetry, cleanup — to polish the deformation.
Tips, Warnings, and Troubleshooting
Tips
- Apply transforms first.
Object → Apply → All Transformson the body mesh before you detect anything. Unapplied scale in particular ruins both alignment and binding. - Detection is a starting point. Treat auto-placed markers as 90% done and plan to nudge a few by hand. That's faster than perfect placement and completely normal.
- Mirror to save time. Perfect one side, then mirror it across instead of placing both sides by hand.
- Use Mesh Selection. Turn on the Mesh Selection lock so you grab markers, not the body, while correcting.
- X-Ray for interior joints. Turn on X-Ray to reach markers that sit inside the mesh (hips, shoulders).
- Check before you align. Always run "Check All Markers" first — aligning consumes the markers, so problems are cheaper to fix beforehand.
- Fingers: tip then knuckle. In manual placement the first click is always the fingertip, the second the knuckle.
Warnings
- Aligning the rig consumes the markers — make sure they're correct first.
- "Delete All Markers" clears everything with no per-marker undo prompt.
- Finger detection needs the HAND and ELBOW markers from body detection. Detect the body before the fingers.
Troubleshooting
Markers land in the wrong place / everything looks skewed
Almost always unapplied scale or rotation. Undo, apply all transforms, and detect again.
Detection seems to do nothing
Confirm the Body Mesh picker points at your actual character mesh (not a marker, an eye, or a stray object), and that the object still exists in the scene.
Fingers are missing or collapsed
Make sure the body was detected first (fingers need HAND and ELBOW). On stylised hands, switch to the Geometric engine and adjust Knuckle Depth, Thumb Depth, and Min Finger Size, or place them manually.
A few markers are outside the mesh
"Check All Markers" flags these. Select each one, turn on X-Ray, and drag it back onto the surface — or re-run detection.
The EasyDetect (AI) buttons aren't showing
You're on the Lite edition (geometric only), or the AI runtime couldn't load on your platform. The geometric detectors do the same job and are always available.
The rig deforms badly after binding
Re-check that scale was applied before binding, then use the Skin tab's surgical tightening and smoothing on the affected joints.